Category: Side Dishes

Side dishes for meals including potato side dishes and rice side dishes

Easter Themed Dyed Deviled Eggs

Easter Themed Deviled EggsEaster Themed Deviled EggsEaster Themed Deviled Eggs
Easter Themed Deviled Eggs

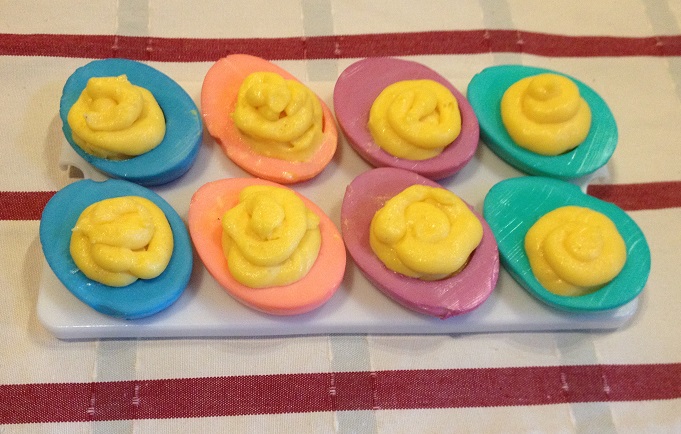
Easter means eggs and lots of color. Combine the two into a uniquely beautiful edible deviled egg dish that your guests will love to look at and enjoy eating.

Dyed Deviled Eggs

Ingredients List for Easter Dyed Deviled Eggs

Preparation Instructions for Easter Dyed Deviled Eggs

Make Basic Hard Boiled Eggs

  1. Place eggs into a large saucepan, cover with cold water, and bring to a boil.
  2. Let eggs boil for 3 minutes; turn off heat, cover pot, and let eggs cook in hot water for at least 20 minutes.
  3. Drain and cover eggs with cold water.
  4. Peel cooked hard boiled eggs as soon as they are cool enough to handle.

Prepare Cooked Eggs For Dyeing

  1. Cut hard-cooked eggs in half lengthwise
  2. Carefully remove yolks.
  3. Place yolks in mixing bowl and set aside for now.
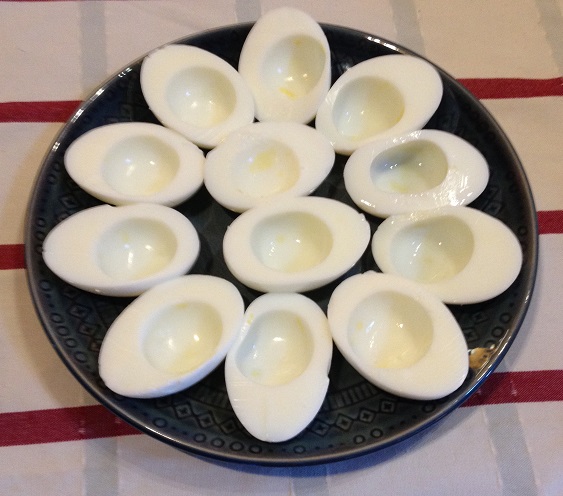
Hard Cooked Egg Whites Ready for Dyeing

Dye the Egg Whites

  1. Carefully rinse the egg whites with cold water to remove any remaining egg yolk.
  2. Prepare a container for the dye solutions. Either use a heavy duty zipper style plastic bag or separate cups for each color you are using. Fill container with 3/4 cup cold water.
  3. Add food color drops to water to get desired color – see blending chart below. Use 10 or 15 drops of each color will be enough for each main color (red, blue, green, yellow).
  4. Place egg whites in colored water.
  5. Move egg whites around in colored water to evenly color the eggs and avoid light color spots on the egg whites.
  6. Leave the eggs whites in the solution for about 30 – 45 minutes. Once the desired color is achieved. The longer you leave the eggs in the dye solution the deeper the color they will have. Move to next section and prepare filling while eggs are soaking.
  7. Remove eggs and allow to drain on paper towels cut side down.
Colored Egg Whites turned over and drying

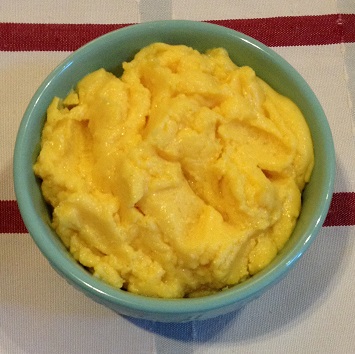
Mixing the Deviled Egg Filling:

  1. Mash egg yolks with a fork or a food processor. Making sure there are no lumps.
  2. Add McCormick White Pepper, McCormick Dry Mustard, salt and 2 to 3 tablespoons mayonnaise to mashed egg yolks. Mix well.
  3. Add more mayonnaise to get desired consistency.
Prepared Deviled Egg Filling Mixture

Final Assembly of Easter Dyed Deviled Eggs

  1. Spoon a heaping amount of egg yolk mixture into each egg white. Alternately, you may use a pastry bag to pipe the egg yolk mixture into the egg whites.
  2. Sprinkle the tops with McCormick Smoked Paprika for flavor and presentation.

Place colored deviled eggs on plate and enjoy!

Food Color Blending – Use Equal Drops of Each Color

  • red + blue = purple
  • blue + yellow = green
  • yellow + red = orange
  • red + green = brown
  • green + yellow = lime green
  • blue + green = turquoise

Lawry’s Mexican Rice Recipe

Picture of Package of Lawry's Mexican Rice Seasoning Mix
Package of Lawry's Mexican Rice Seasoning Mix

Using Lawry’s Mexican Rice Seasoning is a simple way to make a delicious seasoned rice in 20 minutes. While Lawry’s Mexican Rice Seasoning is a blend of Southwestern US (Mexican) Inspired Flavors, it’s spicy flavor lends well to the flavors of India equally well. So while this Mexican Flavor is great as a side dish for tacos, it’s equally well suited as a side dish to accompany Indian dishes such as Tandori Chicken.

Mexican Rice Wraps
Make a quick weeknight meal with Lawry’s Mexican Rice similar to Chipotle’s.

What you need:

  • Prepared Lawry’s Mexican Rice
  • Cooked Chicken (leftover Rotisserie Chicken works well)
  • Sour Cream (low fat) or Guacamole
  • Shredded Cheddar or Mexican Cheese Bland
  • Jar of Taco Sauce
  • Soft Tortillas
  • Shredded Lettuce
  • Chopped Tomato

To Make (Note: Don’t over stuff, a little of each ingredient will work fine):

  1. Chop up the chicken.
  2. Heat Tacos.
  3. Place some chicken in the wrap. Top with Mexican Rice and some taco sauce.
  4. Top with Lettuce and Tomato (if desired), and add cheese, sour cream (guacamole). Wrap Up.
  5. Serve with Mexican Rice on the side.

Picture of Prepared Lawry's Mexican Rice In Pan
Prepared Lawry's Mexican Rice In Pan

To Make a Stove Top Serving of Lawry’s Mexican Rice

  1. Add water, oil, and Lawry’s Mexican Rice Mix to a 2 quart sauce pan.
  2. Bring to a boil.
  3. Add rice. Return to boil. Cover. Reduce heat to a simmer and cook for about 20 minutes (until water is absorbed).
  4. Remove from heat. Let sit for 5 minutes. Fluff with a fork and then serve.

Prepared Serving of Lawry's Mexican Rice

Author: Matthew Schroebel Author: Matthew Schroebel

Easy to make Crispy Potatoes Pancakes

Easy To Make Potato Pancakes (Blini)
Easy To Make Potato Pancakes (Blinys)

This dish is an excellent change of pace from mashed or baked potatoes as a side dish for pork chops, roasts and hamburgers. We used to make this recipe with fresh potatoes by peeling, shredding, and ringing out the excess water. That’s a lot of work and there are a couple obstacles to avoid. First, you have to have some McCormick Anti-oxidant on-hand to keep the shreds of potatoes from browning. All of those thin slices of potato brown almost immediately after shredding unless the Anti-Oxidant is used. It’s citric acid, just like in the OJ you drink, but without the flavor. Second, because you have to put those shreds of potato into the Anti-oxidant mixture, they get really wet and it’s really difficult to get rid of the excess water. And, the excess water makes it difficult to get the potato pancakes to form properly – they’ll fall apart while cooking.

So, we found the trick (aka cheat) to making delicious, well formed, simple to make Crispy Potato Pancakes is to cheat a little, and buy the Simply Potato Hash Brown Potatoes in the dairy section of your grocery store. The peeling is done and there is no extra water. This makes our recipe for Crispy Potato Pancakes a snap. From start to finish in about 10 to 15 minutes, just about the same time to cook those pork chops and a vegetable to square out your lunch or dinner. Plus these Potato Pancakes keep well in the refrigerator after being cooked and make an excellent leftover. Just zap them in the microwave for 20 seconds or so to warm them up.

Simply Potatoes Shredded Hash Browns
Package of Simply Potatoes Shredded Hash Browns

Recipe for Easy Crispy Potato Pancake

  • 1 store bought package of Simply Potatoes Hash Brown Potatoes
  • 1 egg
  • 1/2 cup white flour
  • 1/2 cup chopped scallions or onion [we prefer scallions as the green tops add some color]

  1. Combine the scallions and potatoes in a large bowl.
  2. Sprinkle the flour evenly over the potatoes and scallions (or chopped onion).
  3. Beat the egg in a small bowl and pour over the potato mixture.
  4. Mix well by hand. Latex or nitrile gloves work well as the mixture is sticky and sticks to your hands.
  5. Form into 4″ pancakes about 3/8 – 1/2″ thick. Place formed potato pancakes on wax paper.
  6. Heat a large lightly greased (with heart healthy olive or canola oil) non-stick skillet add 2 to 3 potato pancakes, depending on the size of your pan (ours pictured is about 14″ in diameter).
  7. Cook over medium heat for 3 – 4 minutes (until lightly browned, lift and peek underneath if required).
  8. Cook an additional 3 to 4 minutes.
  9. Remove to a warm plate and cover to keep warm while cooking a second batch.
  10. Serve plain, with low fat sour cream, ketchup or season with Old Bay French Fry Seasoning.

Makes six 4″ potato pancakes.


Just placed in pan to cook:

Crispy Potato Pancakes Cooking in Pan

After being flipped once, note the browning is “just right.”

Crispy Potato Pancakes, Turned Once

Ready to serve:

Serving of Crispy Potato Pancakes

Author: Matthew Schroebel

A Simple Grilled Tomato Salsa

Roasted Tomato Salsa

Break out that rarely used Waring Blender to make this quick and easy Salsa for your chips. This recipe is an absolute ease to make. No cutting and dicing just a couple whirls of the blender does the trick.

Here’s what you need:
2 Medium/Large Fresh Vine Ripe Tomatoes
1 Large Red Onion
1/2 bunch Fresh Cilantro

Grill the tomatoes and red onion until blackened. Use care with the tomatoes because they will become soft as they cook. Handle the tomatoes with tongs and have a plate handy when you pick them up because if the tomatoes become too soft they might fall apart. So you may find it best to simply roll the tomatoes from the grill to the plate instead of risking the consequences of having the tomato fall through the grill.

Now place the tomato, red onion and cilantro in a Waring Blender and blend on high speed until the Salsa is chopped fine. Quite simply and delicious. Serve immediately with your favorite potato, tortilla, Doritos, or Tostitos chips. Refrigerate unused portion.

Cajun Dirty Rice

Prepared Cajun Dirty Rice in pan

This is an excellent recipe for Cajun Dirty Rice and what’s quite remarkable about it is that is had no seasonings in it. Plus, there is no added salt — it’s in the chicken stock already. We used this recipe as a base for the Spicy Old Bay Shrimp Recipe that we wrote about yesterday. This is truly a great taste treat. Be sure to spoon some of the extra sauce from the pan the Old Bay Shrimp was cooked in. The two recipes have flavors that simply complement each other.

3 tbsp butter
1/2 cup onion, diced
1/2 cup celery, diced
1/2 cup red bell pepper, diced
1/2 cup poblano chile pepper, diced
2 tsp Gilroy Farms minced garlic (jarred)
1/2 pound cooked chicken livers, chopped fine
1 1/2 cups chicken stock
4 cups cooked Basmati rice, cooked
1/2 cup fresh chopped parsley

Cook the rice and chicken livers* while chopping the vegetables. Melt the butter in a large skillet, then add the onion, celery, red bell pepper, poblano chile pepper and parsley. Cook, stirring frequently, for 5 – 8 minutes until vegetables are tender.

Peppers, Onion, Parsley, Cooked. Ready to add Garlic and Chicken Stock.

Add the minced garlic, and turn up heat. Add 1/2 of the chicken stock. Let reduce by half, then add other 1/2 of chicken stock. Again, cook until stock has reduced by half — this doesn’t take very long, only a minute or two. Make sure you boil the stock enough. You want a little juice but not so much that you make the rice soggy.

Reducing the Chicken Stock - Note the Rapid Boil

To wrap up this dish, reduce heat, add the rice, and mix in well (this is 4 cups of rice so make sure you choose the right size skillet. Ours in the picture is 14″ in diameter.) Finally, add the finely chopped chicken livers and stir to mix well.

Cooks Note: We use Gilroy Farms minced garlic whenever recipes call for fresh garlic. Gilroy Farms minced garlic has a creamy texture and we find that we have a more garlic flavored taste than when we use chopped fresh garlic. We suppose that’s because of the very fine mince the Gilroy Farms garlic has — this might be reproducible using a food processor — but it’s so much easier to open up the jar and get delightful results everytime!

*Cooking Chicken Livers
We cook the chicken livers in a pan of boiling water for 10 minutes, then drain them and cool them by placing the cooked chicken livers in a wire mesh strainer and running cool tap water over them. Chop the chicken livers very fine (1/8″ crumbs) with a flat bladed knife.

Baked Brown Rice

Baked Brown Rice

If you’ve ever made brown rice before, then you know that you often end up with rice that looks like popcorn – that is, the rice expands and pops out of it’s shell leaving a sorta exploaded look to the rice.

But it doesn’t have to be that way. By baking brown rice in a pan in the oven you can make a brown rice with a texture similar to white rice.

Here’s how:
Bring to a boil 4 cups of water. You can do this on the stove or in a large Pyrex cup in the microwave (start at about 4 minutes in the microwave – depends on your oven, of course).

Heat the oven to 375° F.

Place 2 cups of rice in a baking pan. I use an aluminum throwaway pan lined with non-stick aluminum foil. Place the rice on the foil, and pour the boiling water over the top. Even out the rice.

Cover with aluminum foil and bake for about 45 minutes. Then check to see if the rice is done — it will most likely take an hour. You’ll know when it’s done when all of the water is absorbed by the rice. Don’t bake too long or you’ll find the rice explodes and looks just like you boiled it in a pan.

Refried Beans Recipe

Nutrition Facts Sample LabelWhen we cook our meals we try to avoid using salt or MSG in our recipes. When making side dishes from the packaged foods that come in boxes or cans, the seasonings are all mixed together and it’s almost impossible to cook without salt. By looking closely at the USDA Nutrition Facts label you’ll see these packaged foods are all laden with salt – many of which contain more than 25% of the recommended daily value of sodium in a single serving.

So this post starts a series of easy to make replacements for commonly purchased packaged foods.

Refried Beans

Refried Beans are one of those foods that many of us love to eat with our Mexican and Latin American meals yet many of us have no idea what is in the recipe. For years we’ve purchased our refried beans in a can at the grocer and simply reheated them in the microwave or on the stove top. After making our recipe for Refried Beans we found our recipe to be superior, has no fat, and no salt added.

Pinto Beans (uncooked)Refried Beans starts with Pinto Beans, a small red bean typical in Latin American cooking. We purchase ours at a Latin American Grocer, but if you can’t find a Latin American Grocer near you, buy the red beans in the Mexican or Latin American section at your grocer.

Refried Beans Recipe
Measure out 1 cup of Pinto Beans, pick over them and remove any foreign items like stones and odd plant material. Place the beans in a 2 quart sauce pan, and add about 1 1/2 quarts of water. Place on the stove, cover, and bring to a boil. Reduce to a simmer, and let cook for 3 hours. Check every so often and add water if the pot is drying out.

Just before the beans are done, dice 1/2 onion very fine (1/8″ or so), and saute the onions in 1/2 tbsp of canola oil along with 1 tsp chopped garlic. Cook until tender but not browned.

Drain the beans using a strainer, and place the pinto beans in a 2 quart mixing bowl. Sprinkle the cooked onion & garlic over the top of the cooked beans, and add:
1 tsp ground cumin
1 tsp dark chili powder

Mash the pinto beans and seasonings using an electric hand mixer until the beans are at a consistency that you like. We like our Refried Beans to be coarse and have a little crunchiness to them. Some may want their Refried Beans mashed like the beans that comes out of the canned Refried Beans. Either way, you’ll find this a delicious recipe and a much better and healthier recipe than the canned variety of Refried Beans.

Savory Chestnut Turkey Stuffing

Picture of ChestnutsWhere I grew up we had a couple chestnuts trees in our yard. You have to have at least 2 chestnut trees if you want to get chestnuts because the trees are self sterile. Our two trees were fantastic and and we always got lots of nuts from them. We ate the chestnuts in the typical methods of roasted and steamed, but my favorite way to eat chestnuts is in stuffing for turkey and chicken.

About Chestnuts
If you don’t have your own chestnut trees to gather the nuts from (before the squirrels do), then bare in mind that they are only briefly available in the grocery store from about Mid-October until just around Christmas. The chestnuts themselves are enclosed in a thin brown case with a furry inner lining. The nut of the chestnut is a soft, moist and woody tasting meat. They don’t keep well out of the shell, and should be kept in a moist part of your refrigerator until ready to use to keep them both from spoiling and drying out. If you gather fresh chestnuts, then you should wash the nuts, then treat them for worm eggs by placing them in a pot of water at 105° F for 10 minutes.

Homemade Chestnut Turkey Stuffing

Picture of Chestnut StuffingEach year at Thanksgiving and Christmas we make our favorite Chestnut Stuffing for Turkey. We prefer to make this stuffing in a pan or casserole dish outside the bird but you could stuff the bird if you like.

Ingredients in Chestnut Turkey Stuffing

  • 12 ounce bag unseasoned bread cubes for stuffing (one 1/2 24 ounce loaf of stale bread cut into cubes)
  • 1 pound mild pork sausage
  • 12 chestnuts
  • 3 tbsp butter
  • 1/3 cup celery pieces
  • 1/3 cup diced onion
  • 1 to 1 1/2 cups milk
  • 1 1/2 tsp Poultry Seasoning

To make Chestnut Turkey Stuffing

  1. Make an x in the tops of the chestnuts, and bake in an oven at 350° F for 15 minutes. Then remove from oven, let cook, peel the chestnuts, and chop finely.
  2. Melt butter in a 3 quart non-stick saucepan.
  3. Add onion, celery, sausage and cook until sausage has cooked through ans is lightly browned, about 10 – 12 minutes.
  4. Place bread cubes in a large bowl. Mix in the chopped chestnuts, onion, celery and sausage. Sprinkle with poultry seasoning and mix well.
  5. Add milk, a little at a time, mixing with additions, until bread cubes are moist.
  6. Put the stuffing in a non-stick pan or casserole.
  7. Bake in a 350° F. oven covered for 1/2 hour. Remove cover and cook another 8 – 10 minutes until lightly browned on top.

Popeye’s Cajun Rice Recipe

Popeye's Cajun Rice
Every time we go to the Popeye’s Chicken shop, we get their Cajun rice. We simply love it. So here’s our rendition of Popeye’s Cajun Rice. We make our Cajun Rice using Basmati rice which is different than the long grained rice used by the Popeye’s restaurant chain.

Popeye’s Cajun Rice

  • 1 cup Basmati Rice (you may substitute long grain white rice instead).
  • Chicken Broth
  • 1/2 pound chicken livers
  • 1/4 pound lean ground beef
  • 1/3 cup finely diced onion
  • 1/4 cup finely diced green onion (scallion)
  • 1/3 cup finely diced celery
  • 1/3 cup finely diced bell pepper
  • 1/8 tsp ground white pepper
  • 1/8 tsp Tabasco sauce
  • 1 tsp minced garlic
  • 1 tsp Gumbo File
  1. Cook rice according to package directions except substitute chicken broth for the water called for in the recipe. 1 regular sized can of chicken broth contains about 2 cups of broth.
  2. Brown the 1/4 pound of ground beef in a non-stick skillet. Break up fine while cooking.
  3. As you’re cooking the ground beef, also cook 1/2 pound of chicken livers in a pot of water. Cook about 10 minutes after the water begins to boil. Strain, then chop fine.
  4. Add the diced onions, green onion, celery, bell pepper, garlic, white pepper, Tabasco Sauce and Gumbo File. Saute until the onions, peppers, and celery are cooked, about 4 – 5 minutes.
  5. Add the cooked rice and chopped chicken livers, and stir together. Heat for about 2 minutes, then serve.

Garlic Tabasco Mashed Potato Recipe

Picture of Garlic Mashed PotatoesThis recipe for Garlic Tabasco Mashed Potatoes is a treat. That is, of course, if you like garlic like we do. This recipe isn’t too garlically in taste, and the Tabasco Sauce adds its own twist to the flavor of the mashed potatoes.

Garlic Tabasco Mashed Potatoes

  • 4 to 5 medium new or red potatoes
  • 1 tsp Nina chopped garlic
  • 2 tbsp finely chopped fresh onion
  • 1/2 to 1 tsp Tabasco Sauce
  • 1/2 cup milk
  • 2 to 3 tbsp softened butter
  1. Place milk and butter in a warm location to soften butter, and warm milk.
  2. Peel and cut the potatoes into large chunks.
  3. Place the potatoes into a 3 quart non stick saucepan and cover with water.
  4. Add the finely chopped onion, and chopped garlic to the saucepan.
  5. Cover the saucepan, heat to a boil, and cook for 20 minutes.
  6. Drain potatoes, and place into a mixing bowl.
  7. Add the Tabasco Sauce, 2 tbsp softened butter, and 1/4 cup milk. Beat the mashed potatoes with a hand mixer until smooth and creamy adding additional milk and butter as needed to make creamy.