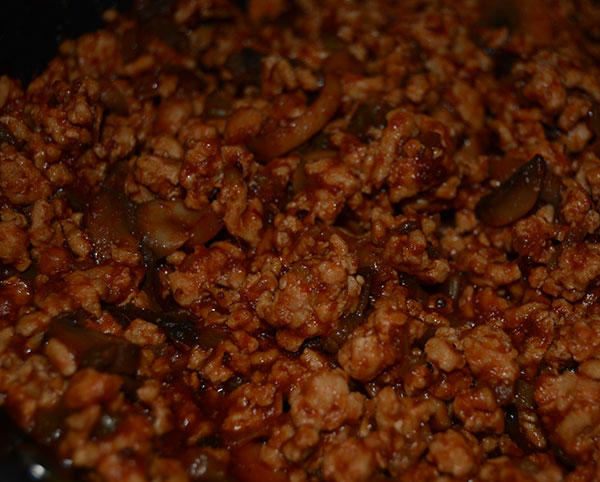
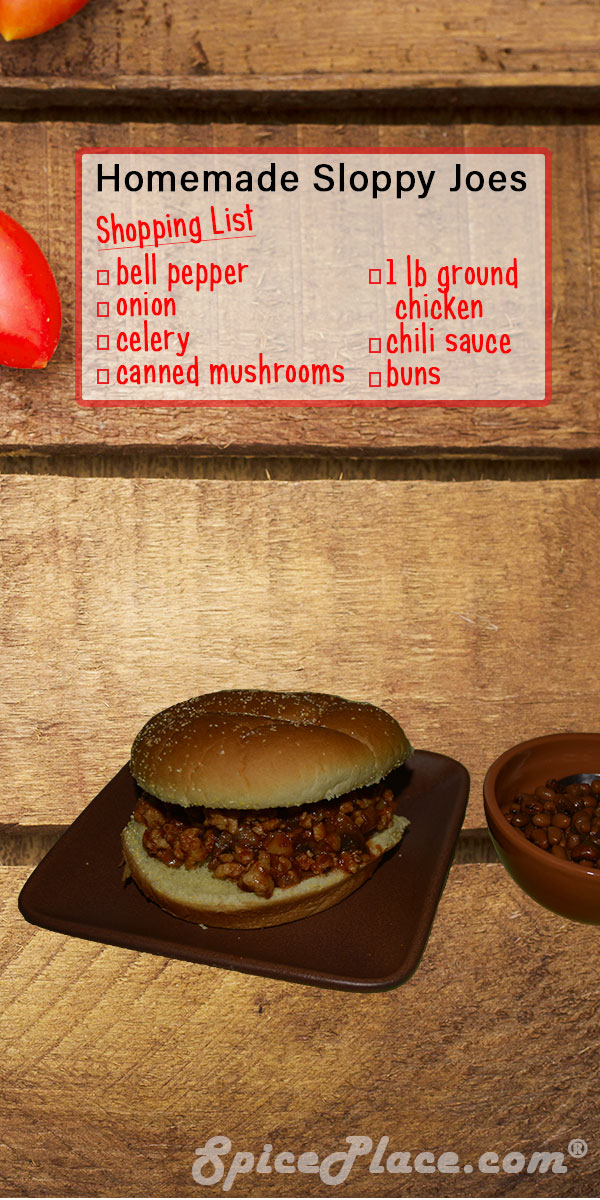
Greek Ground Lamb, Spinach and Egg Noodles

October 25th, 2007

Prepared Greek Ground Lamb, Spinach and Egg Noodles

If you’re looking for an easy to make meal for four, that has a Mediterranean taste, and flair of Greece then consider the following dish. It’s made with ground lamb, spinach, onion, egg noodles and is flavored with McCormick Greek Seasoning. Some Feta cheese adds the final taste of Greece to the dish.

First start this dish by browning the ground lamb. At the same time heat 2 quarts of water to boiling in a 3 quart pan. For the ground lamb, I used store bought lamb from Safeway and there was a bit of fat in the pan after cooking. So what I do is soak up the fat with Viva paper towels, they’re really absorbent. Just swish them around in the pan with the spatula. I had to use several towels and must have been unlucky in the package of ground lamb I choose.

When the lamb has browned:
Add 1 1/2 cups of egg noodles to the boiling water; these will cook for 7 to 8 minutes.

Then add the following to the skillet:
1/2 cup chopped onion
2-3 tsp McCormick Greek Seasoning

Sprinkle the seasoning evenly over the pan so the meat is flavored equally. Cook until the onion is clear.

Add 1 to 1 1/2 cups frozen chopped spinach leaves to the skillet, stir often to cook the spinach evenly.

After 2 to 3 minutes the spinach should be cooked, and if the timing is right your egg noodles will be ready to drain. Test by tasting one, and if done drain, add to the skillet and stir in well.

To serve, scoop out some of the mixture into a bowl or plate and top with some crumbled Feta cheese. If you like Greek cooking, you should be happy with this simple noodle dish. Cooking time is about 20 minutes total.

An Easy Trick for Keeping Cut Vegetables & Fruits Fresh Looking

August 19th, 2007

McCormick Anti Oxidant
Chances are if you ever peeled, sliced or shredded a potato you found it didn’t take long for the nice white color of the potato to turn a lovely shade of brown. This happens because the oxygen in the air reacts with the enzymes in the cells of the potato which quickly changes the white potato to an unappealing brown color. The same is true with apples. Oxygen also reacts with that fresh cut salad turning the edges of the leaf brown.

Luckily, there is an easy solution to stop the oxidation. The simplest method is placing those peeled potatoes and sliced apples in water. This works well when there is only a limited time between preparation and cooking and when the pieces of potato and apple are large.

If you shred the potatoes and apples, the oxidation occurs very quickly. In fact, when I shred potatoes using my KitchenAid stand mixer’s shredding attachment, the potato starts to brown almost at the moment it’s coming out of the attachment. In this case as well as when sliced apples are to be displayed, I turn to McCormick Anti-Oxidant. Through the magic of chemistry, this product, which is made primarily with food grade citric acid, effectively stops the browning of sliced fruits and vegetables.

  • For potatoes, simply mix up 1 1/2 tsp of McCormick Anti Oxidant with each quart of water (or 2 tbsp to a gallon for larger needs) and let the potatoes sit in the solution for three minutes and then drain.
  • For shredded potatoes, put the anti-oxidant mixture in a bowl placed directly under the shredder to cath the shredded potatoes as they fall out.
  • For green vegetables such as cucumbers and lettuce, use 1/2 tsp anti-oxidant to 1 gallon of water. One gallon of solution will treat 40 pounds of vegetables and fruit.
Shredded Potatoes in Anti Oxidant Solution
Shredded potatoes in anti-oxidant solution

One of the best reasons for using anti-oxidant with foods instead of other solutions such as lemon juice is the pure citric acid adds no tastes to the food. When I used lemon juice to prevent the browning of my sliced avocado it always added the taste of lemon to my salads. You can see from the picture above how white the shredded potatoes are in the anti-oxidant solution, and they stay that way while cooking.

Psst. Know The Secret For That Tender Steak?

July 6th, 2007
Barbecued New York Strip Steak

For years, we’ve been on the search for finding that tender cut of meat that we get at the restaurant and from specialty steak suppliers. We’ve bought steaks from gourmet shops, organic farmers, organic grocers, high end grocers, and so on. Yet, we never seemed to get a tender steak. We tried USDA Choice and USDA Prime cuts, which made no difference either. We almost gave up on the idea believing that that restaurants had a specialty supply of select meats. Then one day recently, the light came on and we discovered the secret.

We’ll tell you in just a second what the secret is and when we do, you’re going to say, duh! And it’s a big duh, something we all should know and in fact do know about. The secret is, (ready?) Adolph’s Meat Tenderizer. See, it’s something you know about, probably have in your kitchen cabinet and most likely don’t use very often. But you should use Adolph’s often and on every steak you barbecue this summer. Oh, one more question. Ever wonder how that barbecue joint makes tender baby back ribs and beef brisket? The answer to that question is that they use Adolph’s Tenderizer. That’s it.

Adolph's TenderizerSo break out that bottle of Adolph’s Meat Tenderizer this weekend, sprinkle a little on both sides of the steaks. Use about 1 tsp of Adolph’s per pound of meat. If you have one, prick them with a corn on the cob holder, otherwise use a fork. Then season as you desire, and they’re ready to grill immediately. You may cover and refrigerate for 2 - 3 hours for more tenderizing but that’s usually not necessary.

Adolph’s is made from the Papaya, is all natural and contains no MSG. It’s a little bit of magic in a bottle. What are you waiting for? Light that grill and be surprised with how you can now make those tender steaks like you get when you eat out at that expensive restaurant and without paying $20.00 a pound for them. Try it! You are certain to be amazed.

For This Memorial Day Make it a Lamb Burger

May 27th, 2007
Lamb Burger
Picture of a Lamb Burger

Tired of eating plain old hamburgers, or are just looking for something a little different to have on the barbecue this weekend? Consider using different meats for your burger grilling needs. Delicious burgers can be made from ground pork, chicken, turkey, and lamb. The secret is to properly season these meats before cooking so that the resulting burger is tasty.

Lamb is a traditional Greek meat dish which is often seasoned with mint. We love the flavor we get when we use McCormick’s Greek Seasoning with lamb dishes, and the lamb burgers are no exception. This is really a quick to make and unique tasting burger.McCormick Greek Seasoning

Greek Seasoned Lamb Burgers
1 pound lean ground lamb
2 tsps McCormick Greek Seasoning

Place ground lamb in a bowl. Sprinkle 1 tsp of Greek Seasoning over top of the meat and mix. Sprinkle remaining 1 tsp of Greek seasoning over top of meat and mix well. Then form into 4 to 5 burgers. Grill until well done. Serve on toasted rolls.

We served of lamb burgers on toasted rolls spread thinly with mint jelly. Top with lettuce, tomato, and cheese.

Three Big and Bold Seasonings for your Summer Cooking

May 12th, 2007
McCormick Big & Bold Seasonings
Big and Bold Seasonings from McCormick

New at our Spice Place online store are McCormick’s Big and Bold Seasoning Blends. This is a line for very unique blends of seasonings from McCormick that we’ve simply fallen in love with. The flavor experts at McCormick have crafted some very delicious and savory blends into these seasonings. Each of these seasonings has a unique blend of herbs, and spices and they contain very little salt. We offer each of these spice blends in professional chef size containers ranging from 19 to 21 ounces.

Ranging in taste from Key West’s citrus flavor through Santa Fe’s cumin chili taste to Monterey’s red bell pepper seasoning, the McCormick Big and Bold Seasonings are a treat for the taste buds. These seasonings can be simply sprinkled on your foods, or mixed with liquids such as vinegar, lemon juice or water to make a delicious marinade. The flavors are unique, and will add a whole new set of tastes to your meals.

  • Key West Style - A blend of lemon peel, basil, thyme and other herbs and spices for use on shrimp, seafood, chicken, beef, and pork.
  • Monterey Style - Bold Red Pepper and Roasted Garlic flavor goes well with chicken, fish, seafood, pork and beef.
  • Santa Fe Style - A rich taste of the southwest seasoned with chili, cumin and just the right amount of garlic. Use with beef, pork, chicken and seafood. Blend 1 tbsp with a pound of lean ground beef for a Santa Fe style hamburger.

As the summer barbecue season approaches, curious chefs should consider this line of seasonings for there backyard cooking. Each seasoning has it’s unique taste that will make your outdoor cooking taste great and you’re certain to receive rave reviews of your recipes from your guests.

Making a Monterey Seasoned & Grilled Whole Chicken

May 1st, 2007
Barbecued Monterey Style Seasoned Chicken

McCormick’s Big and Bold Monterey Style Seasoning has become a favorite seasoning of ours. It’s a mix of coarsely ground garlic, red bell pepper, roasted garlic, red pepper, and contains tumeric and annatto for adding a yellow color to foods. We find that the yellow color adds a pleasing and appealing look to chicken. So today we’re going to share our recipe for making a barbecued whole chicken seasoned with McCormick’s Monterey Style Seasoning along with a little bit of chili powder.

Monterey Seasoned Chicken Recipe
a 4 pound whole chicken
2 tbsp McCormick Monterey Style Seasoning
1 tsp chili powder
1 tbsp sugar
2 tbsp vinegar
1/2 cup water

  1. Wash the chicken under cold water and set on a plate to allow excess water to drain off.
  2. Place the Monterey Style Seasoning and Chili Powder in a cup. Add sugar, water and vinegar. Stir to mix well.
  3. Put the whole chicken in a one gallon size freezer zip-loc storage bag.
  4. Dump the seasonings over top of the chicken, seal the bag, and flip over a few times to distribute the seasonings. Place the chicken in the refrigerator and marinate for about 2 hours turning over every 1/2 hour so the seasonings evenly infuse the chicken.
  5. Since this is a whole chicken, it needs to be cooked indirectly so it cooks slowly and completely. So place the charcoal on only one side of the grill. Light grill.
  6. Remove the chicken from the zip-loc bag, and place into a disposable heavy-duty aluminum pan that has the bottom lined with non-stick aluminum foil. We use the disposable pans because the smoke from cooking will permanently mark a real roasting pan.
  7. When the grill is ready, place the chicken on the side away from the heat, cover and cook for 1 to 1 1/2 hours or until the internal temperature of the chicken is about 170° F. For proper food safety, it’s very important that a meat thermometer is used to make sure the chicken it cooked thoroughly to prevent illness from under cooked chicken.
  8. Let the cooked chicken sit for 10 minutes before carving or else you’ll find you have shredded chicken (instead of sliced chicken).

A Delicious Mexican Grilled Chicken Recipe

April 20th, 2007
Mexican grilled chicken

Several years ago we had lunch from a Mexican chicken restaurant near us called El Pollo Primo. They cook the chicken on a couple large griddles, and then serve a few pieces of whole cooked chicken on a plate along with some corn tortillas, salsa, and Spanish rice. Then at the table, the chicken is shredded by customer, placed on the corn tortilla, mixed with some Spanish rice and some salsa. Then the tortilla is rolled up, and eaten. We found this to be a delicious and unique way of serving chicken.

So over the years we’ve tried to replicate their seasoning on the chicken and we think we finally hit it.

El Pollo Primo Grilled Chicken

1/2 cup canola oil
3/4 cup water
1/4 cup vinegar
1 tsp chopped garlic (about 2 cloves)
1/2 tsp ground cumin
1/2 tsp ground corriender
1/2 tsp annatto seed (from a Latin American grocer)

The annatto in this recipe adds the lovely yellow coloring to the chicken that you see in the photograph above.

Place the canola oil, water, vinegar, garlic, cumin, corriender, and annatto seed in a blender. Blend on medium high speed for 1 - 2 minutes to allow the annatto seed to be chopped up by the tines on the blender. Alternately use ground annatto, and whip up well with a wisk.

Wash, and place 5 - 6 chicken breasts and thighs in a large, freezer duty ziplock bag. Pour the seasonings over top of the chicken and seal the bag. Turn the bag over a few times to coat the chicken well, then place in the refrigerator. Let marinate for 4 to 6 hours, turning over ever hour or so.

Cook the chicken on a griddle or large iron frying pan until done, about 15 - 20 minutes to a side.

Serve with warmed corn tortillas, Spanish Rice, and your favorite salsa. You may optionally add sour cream, and cheese.

How to make a low fat homemade breakfast sausage

April 14th, 2007

Breakfast Sausage in a SkilletWe like to have breakfast sausage every once in a while. Yet often the brands at the grocer are laden with fat. We do know of

one brand

that is fairly lean, but most store bought sausage is very fatty. It seems the manufacturers often can resist the tendency to want to use up the fat and make something off it. Often you hear that the fat is required for the taste. We haven’t found that to be the case at all, and make our own sausage using store bought ground pork.

Sometimes we find a nice looking pork butt roast, remove as much fat as possible and then grind it up ourselves in our meat grinder. This is a great way of really making sure the butcher isn’t trying to make something off their fat just like the sausage manufacturers do! If you don’t have a meat grind though, you can ask your butcher to trim off the fat before grinding the pork butt, and tell them you’ll pay for the fat on the side. Personally, I like being in control of the grinding and making absolutely sure I can get rid of as much fat as I can. An honest butcher will do as you ask and make you a nice lean ground pork.

We happen to have a sausage stuffer too and sometimes make stuffed breakfast sausage. It’s a lot of work to stuff your own sausage and yet it’s rewarding since you know what’s in the sausage isn’t loaded with fat. This article is about make homemade sausage patties so we’ll reserve the discussion on making sausage links for a future article.

Pork Nutrition FactsWe started our homemade breakfast patty sausage using store bought ground pork. According to the nutrition facts on the pork, the amount of fat per 1/4 pound of ground pork is 22g which is 34% of the daily value. Readers might think that value is high, but that amount is for a 4 ounce serving. The typical fat content of packaged breakfast sausage is 22g per 2 oz serving, so the fat in our homemade pork sausage is about half of the fat in prepared sausage. The proof of this is in the picture above of our sausage cooking in the skillet. Take a look closely and you’ll see that there is no excess fat around the sausage. Keep in mind too, that we’re using store bought ground pork and the butcher just can’t resist the opportunity to get $4.00 a pound for fat. If we ground our own pork, and removed all of the visible fat then we could easily have cut the fat in half again.

What you need to make homemade sausage patties
1 to 1 1/4 pounds lean ground pork
1 tbsp very finely diced onion
1/4 tsp ground white pepper
2 tbsp parsley flakes
1 tsp ground sage
1/4 tsp chervil
1/4 tsp marjoram
1/4 tsp savory
1 tbsp water

Place all of the ingredients in a large bowl and mix well with your hands. Form into 5 to 10 patties depending on your preference. Cook over medium low heat in an ungreased non-stick skillet until browned, turn and brown the other side.

Make sure to notice how little fat is left in the pan when you’re done cooking these patties.

Homemade Spanish Rice

April 3rd, 2007

Homemade Spanish Rice RecipeContinuing with our latest theme of homemade recipe replacements for store bought packaged foods. The recipes we’ll feature in this series will be simple to make and tasty too.

Today’s side dish recipe is Spanish Rice, a mix of rice, celery, tomatoes and spices. There is no reason to purchase this as a box of dehydrated tomatoes and vegetables because it’s so easy to make from scratch. You find this recipe flavorful with the typical Spanish Rice taste coming for the most part from the chili powder and ground cumin.

Cooking Rice
The Spanish Rice recipe starts with 3 cups of cooked rice (that’s one cup dry rice cooked at a simmer in a covered saucepan along with two cups of water until the water is completely absorbed. Usual cooking times for short grain rice is about 20 minutes. We find Basmati rice cooks faster and is usually done in about 10 - 12 minutes. Brown rice takes longer and takes about 45 minutes. Once the water has been absorbed by the rice, remove the saucepan from the heat and let sit for 5 minutes. For our Spanish Rice we used Basmati rice — it’s our favorite rice. If you like, you can use day old rice for this recipe, and you’ll find the resulting Spanish Rice has a different texture.

Spanish Rice Recipe
3 Cups cooked Rice [above]
1/2 onion, chopped fine
2 stalks celery, washed, and diced
1 tsp chopped garlic
1 can diced tomatoes
1 tsp chili powder
1/2 tsp oregano leaves
1 tsp ground cumin

  1. Place 1 tbsp olive or canola oil in a large non-stick skillet and heat.
  2. Add the onions, celery, and garlic, and cook until the onions and celery are tender.
  3. Add diced tomatoes, chili powder, oregano leaves, and ground cumin. Stir and cook about 2 - 3 minutes to reduce the water from the tomatoes a little bit.
  4. Add the 3 cups of cooked rice, and mix well. If usning fresh made rice, the recipe is ready to serve. If the rice was day old from the refrigerator, cook, breaking up the rice some with the spatula, until the rice is warm.

You may add 1/2 cup diced green bell pepper to this recipe if desired. Remove the membrane from the green pepper, and then dice into 1/2 pieces. Add the pepper to the recipe along with the onions and celery in step 2.

Refried Beans Recipe

March 21st, 2007

Nutrition Facts Sample LabelWhen we cook our meals we try to avoid using salt or MSG in our recipes. When making side dishes from the packaged foods that come in boxes or cans, the seasonings are all mixed together and it’s almost impossible to cook without salt. By looking closely at the USDA Nutrition Facts label you’ll see these packaged foods are all laden with salt - many of which contain more than 25% of the recommended daily value of sodium in a single serving.

So this post starts a series of easy to make replacements for commonly purchased packaged foods.

Refried Beans

Refried Beans are one of those foods that many of us love to eat with our Mexican and Latin American meals yet many of us have no idea what is in the recipe. For years we’ve purchased our refried beans in a can at the grocer and simply reheated them in the microwave or on the stove top. After making our recipe for Refried Beans we found our recipe to be superior, has no fat, and no salt added.

Pinto Beans (uncooked)Refried Beans starts with Pinto Beans, a small red bean typical in Latin American cooking. We purchase ours at a Latin American Grocer, but if you can’t find a Latin American Grocer near you, buy the red beans in the Mexican or Latin American section at your grocer.

Refried Beans Recipe
Measure out 1 cup of Pinto Beans, pick over them and remove any foreign items like stones and odd plant material. Place the beans in a 2 quart sauce pan, and add about 1 1/2 quarts of water. Place on the stove, cover, and bring to a boil. Reduce to a simmer, and let cook for 3 hours. Check every so often and add water if the pot is drying out.

Just before the beans are done, dice 1/2 onion very fine (1/8″ or so), and saute the onions in 1/2 tbsp of canola oil along with 1 tsp chopped garlic. Cook until tender but not browned.

Drain the beans using a strainer, and place the pinto beans in a 2 quart mixing bowl. Sprinkle the cooked onion & garlic over the top of the cooked beans, and add:
1 tsp ground cumin
1 tsp dark chili powder

Mash the pinto beans and seasonings using an electric hand mixer until the beans are at a consistency that you like. We like our Refried Beans to be coarse and have a little crunchiness to them. Some may want their Refried Beans mashed like the beans that comes out of the canned Refried Beans. Either way, you’ll find this a delicious recipe and a much better and healthier recipe than the canned variety of Refried Beans.


Bad Behavior has blocked 167 access attempts in the last 7 days.